 We’re going to assume you’re already running a self-hosted WordPress installation sporting the latest and greatest version. All of our themes require version WordPress 4.5+.
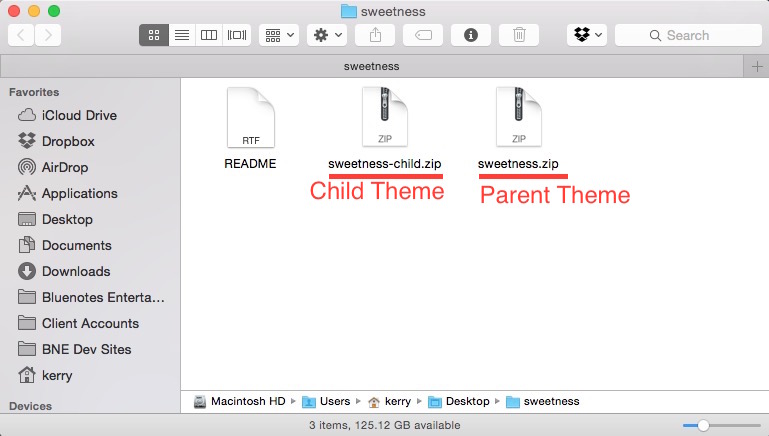
When you download the theme from BNE Creative, you will get an archive *.zip file. You need to unpack this archive first before uploading. After unpacking the downloaded file, you should see at least the following files:
- ReadMe (txt or pdf) – A basic instructions file. This may also be in a folder called “Documentation.”
- {{theme_name}}-child.zip – A child theme for customizations
- {{theme_name}}.zip – The main parent theme.
Installation via WordPress
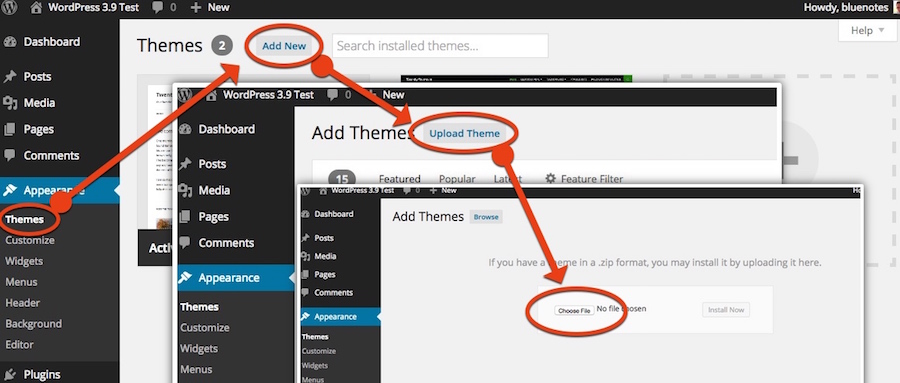
- Login to your WordPress Dashboard.
- Go to Appearance > Themes. Click Add New tab, located at the top of the screen.
- Click Upload Theme.
- Choose the zip file labeled as the theme name found in your download.
- Wait while the theme is uploaded and installed.
- Click on Activate.
Installation via FTP
If you are going to install the theme using FTP, you will need an FTP Client, such as FileZilla.
Please, follow the steps below to install the theme via FTP:
- Log into your hosting server via a FTP client of your choice.
- In the extracted archive folder your downloaded, find {{theme_name}}.zip and unpack it that one as well. You should now see the theme folder.
- Upload the theme folder to your server in path …/wp-content/themes/
- The uploaded path should look like this: …/wp-content/themes/{{theme_name}}/
- Now, login to your WordPress Dashboard and go to Appearance > Themes and activate your new theme.
Common Installation Problems
Below are some common problem many people face when installing a theme and some solutions to those problems.
Problem: After uploading the theme you receive the error message, “Missing Stylesheet.”
Solution: When you upload a theme, WordPress looks for the file “style.css” in the root directory of the theme in order register it. So, if you receive this message, it most likely means that you’ve uploaded the incorrect files. This is a very common problem around ThemeForest items as many people attempt to upload the entire ZIP package they’ve just downloaded thinking it’s the theme, when the theme is actually located inside. If you receive the classic “Missing Stylesheet” error message, make sure you’re uploading the correct files.
Problem: When you try to upload {{theme_name}}.zip through your WordPress dashboard in the way it’s described in the steps above and either it loads and loads with no result or you see the error message “Are you sure you want to do this?” followed by nothing happenning.
Solution: Many of our themes may contain many options resulting in additional images, files, etc, making the theme’s overall file size larger than many other themes you might have used in the past. If you’re facing this issue, it’s most likely because your web hosting account has PHP upload limits in place that are smaller than the size of the theme. So, if this is the case, the solution is simply to unzip the theme and upload it manually through using an FTP application. This process is outlined above.
Problem: You’ve just uploaded the theme and you’re previewing it in your WordPress Themes page, but it doesn’t look quite right.
Solution: The first thing to do after installing one of our themes is to configure your Theme Options page. However, when you view the theme for the first time in the preview window, it’s possible it doesn’t look quite right because of none of Theme Options have been set. So, just go ahead and activate the theme, and then proceed to the Theme Options page (Appearance > Theme Options) and configure the settings.
Problem: You’ve just installed and activated the theme, but when viewing your site, it doesn’t look like the theme demo.
Solution: WordPress is already a very dynamic application, and this theme framework adds onto that making WordPress even more dynamic. If you’ve just installed WordPress and just installed your new theme, most likely you’re just going to see blog posts being listed out on your homepage. If this isn’t what you’re going for, don’t worry. It’s time to start setting up your site. The possibilities are endless here.
Problem: After installing the theme, you can’t assign your custom menu to the theme locations under Appearance > Menus. You assign your custom menu, save the page, but after the page refreshes the menu is not assigned.
Solution: Under Appearance > Menus, while the way this works is built-in to the WordPress core, the theme locations correspond to the current theme you’re using. When you assign a menu to a theme location and save the page, it looks for style.css in the root directory of the current theme in order to assign it. If you’re facing this issue, it most likely means you have uploaded the incorrect files or have not specified a menu location.